Pre-Class Reading
At the end of the semester, you will have the opportunity to present your research as a final project and presentation. What follows provides useful guidance for preparing each. These are only general guidelines. For detailed instructions on the poster and presentation, you will need to attend the scheduled in-class lecture.
Poster
You will be sharing your work this semester with an audience that will be moving in and out of various zoom links. Whether your audience is engaged will depend both on the attractiveness of your presentation and on how daunting it appears at first glance. The most effective posters are easily digested. Sentences and paragraphs should be short, and type should be large. For viewers who want more information, the poster should provide an entry point to further discussion with the author about the project and the results.
Elements that your poster must include
- Title. Your poster should include a banner title in a large font (e.g. 90 pt.). Below this, put the author(s) name(s) and institutional affiliation(s) in a slightly smaller font.
- Sections of poster. Your body text should use a font readable at a distance of at least 4 feet (30 pt). The section names should be larger than this.
- Introduction. Write a few sentences that identify the problem you address, what is currently known about it (watch out for getting long-winded here!), and your approach to investigating it. Consider using a bulleted list rather than a text block.
- Method. Sometimes, the Method section is included in a slightly smaller font so that those who only want the big picture can skip it. You will want to discuss the data sources and how your measures were constructed. Revisit your research plan paper.
- Results. Select the most pertinent results that support your message. Remove everything that is not absolutely necessary: avoid clutter. Think about the most attractive way to present the data in figures. Each illustration should have a headline title providing a take-home message with a more detailed caption below.
- Conclusion. Write the conclusion(s) in short, clear statements, preferably as a list.
- References. You do not need to include every article you read, but include the important ones or any one that is references in your introduction section.
Keys to a successful poster
- Know who your audience is! As yours will be diverse (i.e. experts and non-experts), you will need to make a special effort to frame your question and results in an understandable and interesting way.
- Be brief! Distill it down…down… down… to the very essence of your project.
- Use figures and graphics where possible. Graphics are good attention-getters. But remember, the golden rule of figures (that they MUST be understandable without reference to accompanying text) applies doubly to posters.
- Layout is important! Because text is limited, layout is used to convey the logical structure of your argument. Use columns, boxes, arrows, bulleted lists, etc. to draw your viewer forward through your presentation. Be creative and make the viewing experience intellectually and esthetically satisfying.
Reasons why posters fail
- Too much text. Keep each text block to just a few sentences. Large font size will be readable from far away and will help to keep you from using too many words.
- Unclear. If you leave out key elements, such as objectives, approach, detailed description of variables or conclusions, people who are not insiders on your subject will not understand what your goal was or why it is interesting. As one recent guest evaluator wrote: “students should be made aware of the technical language that they have grown accustomed to using and should learn to explain in detail the meaning of words such as proxy, gapminder, and other indicators such as poverty headcount ratio, since they are crucial to understanding their study. Not having them explained greatly impaired my understanding of their presentation.”
- Poor figures. Some figures are real puzzles, with incomprehensible legends, secret codes, small lettering, cryptic captions, etc. Many spreadsheet and data programs do not produce “reader friendly” graphics (see figures on final page), so you will need to budget extra time to customize your figures so that they are self-explanatory.
- Information overload. Most presenters try to do and say too much in one poster. Yes, your research may have yielded many subtle and intertwined results, BUT you will have to settle for one, two, or at most three take-home messages to convey on your poster.
- Presenter not present. Remember, the poster is just half of the presentation – you are the other half! Be there, so that those viewers who do find your work interesting will be able to engage you in discussion. Remember, poster sessions are interactive – a truly successful poster is an opportunity for the presenter to gain new knowledge and ideas.
- Find your message. Before you begin, try to formulate the essence of what you want to present in a single sentence. This exact sentence probably won’t appear on the poster itself, but it should be your guiding light in deciding what to include and where. Your title and conclusions should be derived directly from this sentence.
- Attention-getters. An attractive title is important, but it must be supplemented by attractive graphics. There is no reason why all of your illustrations need to be the same size. Consider enlarging one of these illustrations (or a flow diagram, model, etc. that is the focus of your message) and placing it centrally to attract viewers. You will still need to pay attention to logical flow, directing the viewer’s attention (once you’ve captured it) up to and through this central illustration to your conclusions.
- Background. Do not use colored backgrounds or patterns underneath your text as both are very distracting. Usually, plain white is best. Do use color in your figures in ways that enhance your message.
- Get feedback! Ask instructors, TA’s, and/or friends to comment on a draft version. Give yourself a break and review everything with a critical eye. Listen if someone says it’s too complicated – most first-time presenters try to cram far too much into their posters.
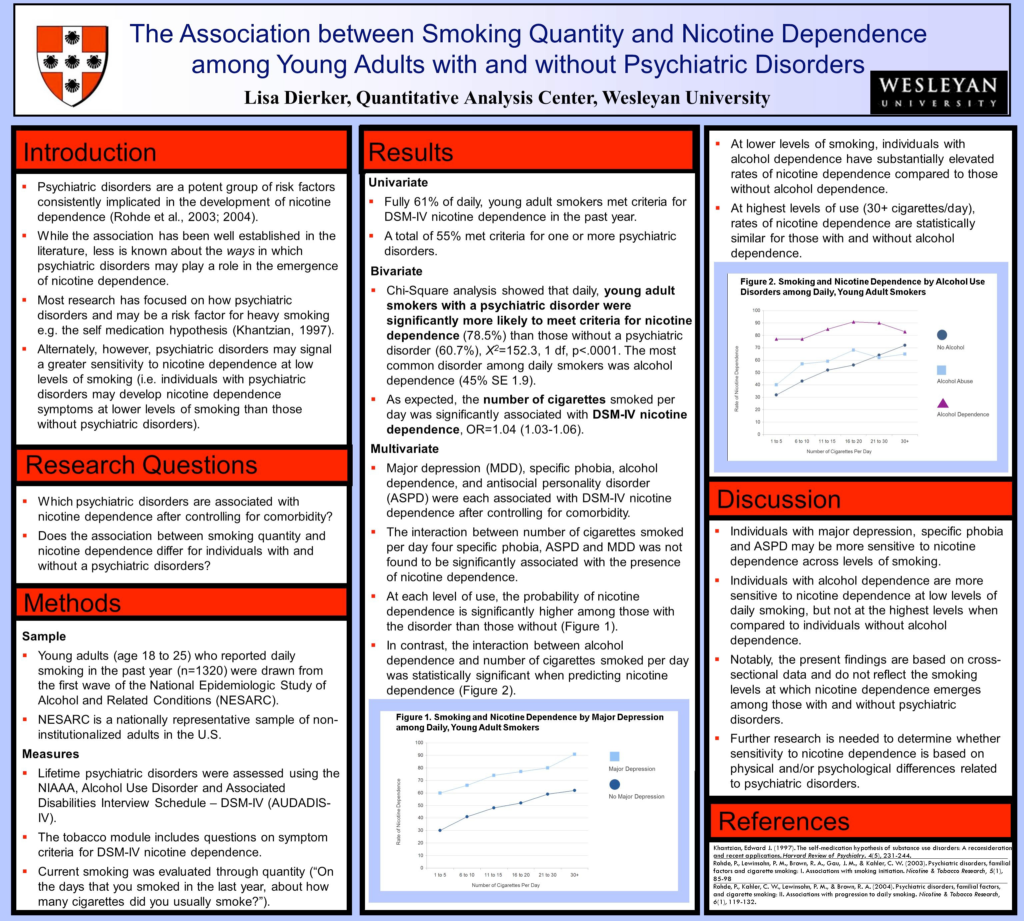
Model Poster:
During Class Task
At this stage you need to re-evaluate what your overall message for your poster will be. Think about a cohesive story to tell. You will likely need to think about what graphs will help you deliver that message and will perhaps need to do additional analyses.
When you are ready to start piecing together your poster, you can use one of the available Power Point templates on moodle or start from scratch. The dimensions of the poster are typically (40″ x 36″). Feel free to change colors or section headings. Since we are not printing your poster this semester, the exact dimensions are not critical. However, some students have opted to share their poster presentation at various student conferences. So it may be to your benefit to adhere to this format in case you want to print it down the line.
You will be creating your own wordpress page that includes:
- Your Project title
- Abstract
- Your name
- A photo of you
- Your poster
The instructions for how you will accomplish this are available on our special poster session webpage (see Project Component M).